Troubelshootlist
Read the instruction first!
Mistakes in the
instruction
Page
12
(1)
Truck lower assembly.
In
the upper picture at the right below the section <<A>> is
shown twice.
This is wrong! The part right beside Part H22 is a section
<<B>>.
Page
13
Parts
H4 should not be cemented but put together dry and fixed after assembly
(see page 14).
Page
15
Mounting
of part H21 should appear at last! Because the part J24 needs to be
adjusted
eventually and all other parts hinder that.
Page
17
Assembly
of upper and lower part should happen earlier. The lots of small parts
make a assembly hard to manage otherwise.
Best
is to do the steps on page 15 first and then put together the upper and
lower part. After that all other parts can be added!
Parts
J43 should be hooked in only for the first. After aging etc. they can
be
fixed.
Page
18
Make
the wire parts A and B from brass wire, not from the copper wire
included.
Page
25
On
the picture showing the assembly of the lock the part B26 is not shown!
It is positioned on the inside of B25 and grips in the notch right
above.
When installing the machined barrel don't forgett the ballast inside
the
lock!
Page
26
Part
M7 is located on sprue M (rails, marked as MX2 in the Plan). The cavity
in parts C33 and C29 need to be treated with putty or superglue.
Page
33
The
barrel can be exchanged by the machined aluminum barrel by Schatton/48
Special Models. Therefore take notice of the assembly instuctions
above.
Page
40
The
jig B17/B37 is colsed on the lower side (see pictures). Part B8 fits
only
in one direction! Check beforehand.
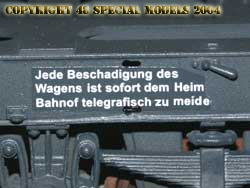
Painting
/ Decals
The
decals are a real task! Besides the fact the the numbering is wrong,
the
text are full of spelling mistakes! Some can be repaired by cutting out
single letters and changing their positions. But some letters simply
don't
exsist.
Here
the only hope is to make your own decals or wait for a correct sheet by
a accessories manufacturer. Another way is dirting them up so they
can't
deciphered anymore.
Here
some of the extra hard ones:
|

|
|
no
words!
|
Here
I interchanged some letters, but unfortunately the S and L are
missing.
|
Filling depressions (not feeling
depressions)
Like said before
the lots of
depressions are the biggest weakness of the kit. Most of them occure
from
the ejectors that seperate the kitparts from the mould. Good moulds
don't
show such depressions, because they are leveled with the mould surface.
Sink holes occure
when less
material is injected with less pressure to the mould. Both defects are
a lack of quality, which could be prevented by the manufacturer.
Treating such
defects right
on a kit means useing putty. It is recommended to check the parts
before
assembling them. Are the defects extrem return the kit to the retailer
you bought it from.
Small defects can be
filled
with superglue or putty. This schould be done in several layers and
with
small amounts of material. The superglue will not set inside or has to
be sanded down in painstaking hard work. When useing putty it is almost
the same. The solvents can't evaporate and weaken the plastic. Which
means
in extrem the part will be damaged. Superglue is harder than plastic
and
therefore hard to sand. But it dries much faster and connects better to
the surface. Large gaps can be filled with a special glas bubble filler
for superglue. This filler kicks the superglue a little and prevents
heating
up. The bubbles are hard and hard to sand therefore. So don't use too
much.
Painting in between steps and
final finish
All
small parts and the hard to reach areas too should be painted before
assembly.
The
steps are as follows:
Priming
(i.e.Mr Surface 500)
Sanding
slightly
Final
paint
Gloss
clear varnish
Decals
Matt
clear varnish
Sanding
slightly (if necessary)
Aging
(dark wash, etc.
matt
or gloss final varnish
Applying
a gloss clear varnish layer is done only once after final color
painting
was applied. After applying the decals a single layer of clear varnish
is applied and sanded with 800-1000 grid wet sanding paper and lot of
water
over the decals afterwards. This will reduce the thickness of the clear
varnish layer so far that the decal will level after a second or third
layer of clear varnish. The decal edge will be almost invisible then.
But
take care while sanding. Only erase the clear varnish layer!
Is
this finished the whole model gets a matt clear varnish (acrylic, if
possible)
coating. This means a lot more paint than usual depending to the size
of
the model.
After
the paint has set for at least 24 hours, that gave all paint layers
time
to dry, aging starts. Except for the wooden grids, which have been aged
beforehand with artists oil paints. The oils are applied on the brown
basic
color and wiped off after the solvent has evaporated mostly. This makes
a nice wooden look.
The
whole gun was treated with a dark wash from brown and black oils which
have been thinned down with Humbrol thinner. With a broad, soft brush
the
whole model is drenched now (this takes the whole man). Also the
airbrush
can be used. The wash will be let set a little and dry, then the
surplus
will be wiped off with a soft cloth. At hard to reach areas a Q-tip
helps.
Clean Humbrol thinner helps to lighten to dark areas. It is important
that
the last spraypainted layer was a water/alcohol based acrylic paint, to
prevent the thinner from eating the paint below! After drying a dry
brushing
can apear too with slightly lighter colors and or rust brown. Always
start
careful with less paint.
It
is almost impossible to prevent scratching the surface finish while
working.
This meets the real thing too. The defects need to be touched up
necessaryly
with airbrush or brush. But applying a clear varnish has changed the
tone
of the color slightly. This again causes stains. Also badly or less
stired
paint or different manufaturers may cause this.
Therefore
the primary paint tone (tank grey) should be filled from different cans
to a single bucket and stired well. If possible a lager can should be
purchased
instead. I used up about 5 cans of Tamiya XF-64 tank grey and the sixth
is ready to follow.
A
small difference in shades makes sense at all in this case too. Because
large objects like this needed to be touched up constantly. Differences
in tone are inevitable. That is why I used it consciously in this case.
The
ongoing color design should orient on historic pictures from that time.
Depending on the place of action some special features may occure.
|
|
|
The
completed lock block.
It
was painted with
Gunze
Metalizer, polished and sealed with Gunze Metal Primer.
|
After
that the grease was done with oilpaints which have been applied and
wiped
off again. After the oils are dry it was again painted with clear
varnish.
|
The
wooden walkway was primed with XF-10 brown with a brush and painted
with
a oils dark wash then. When dried almost, it was wiped of partionaly.
|
|
|
|
|
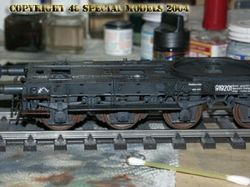
The
whole chassis was treated with a dark wash from black and dark brown
oils
thinned with Humbrol thinner.
|
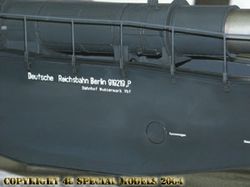
The
carriage was treated the same way. Beforehand touch up areas were
willingly
applied.
|
Especially
in places dirt tends to stay the wash should stay. After a short period
of drying the surplus is wiped off.
|

|
|
|
|
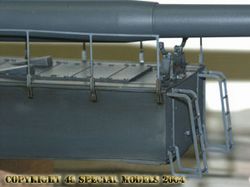
The
platform of the ammo container. Later gun versions had have an extended
platform on the container and a switch for two trolleys.
|
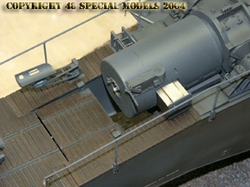
The
lock block is movable and can be taken out or pushed in completely (for
elevating the barrel).
|
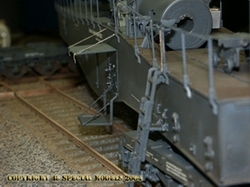
The
ladders are not fixed on the top. So they can be adjusted in different
positions. The chains holding the hatch are made after original
pictures.
|
| |
|
|
| |
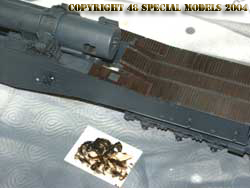
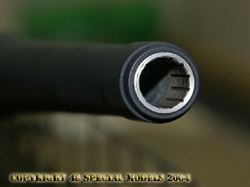
The
muzzle of the Schatton/ 48 Special Models barrel. The grooves reach
into
the barrel for some cm. They where treated with oils too, to show them
better and simulate wear. The inner barrel tube was brought out by
sanding
of the paint with 800 grid sanding paper.
|
|
Main
View
|
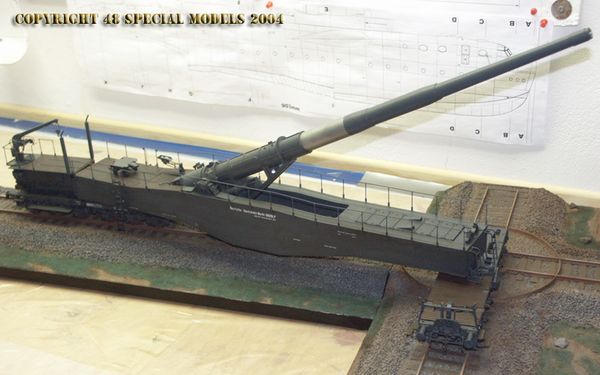
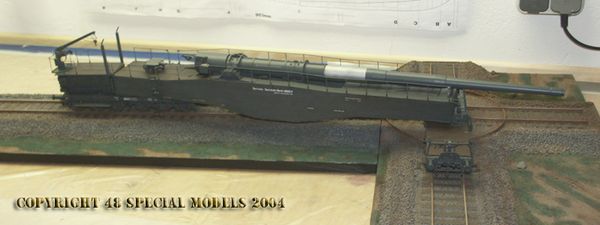
The
gun on its turntable. Always the front chassis is placed on the
turntable!
The
elevation of the barrel is managed without mechanical blocking.
|
|
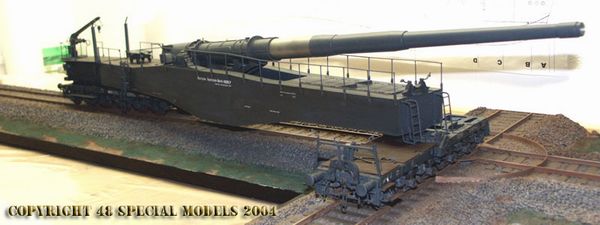
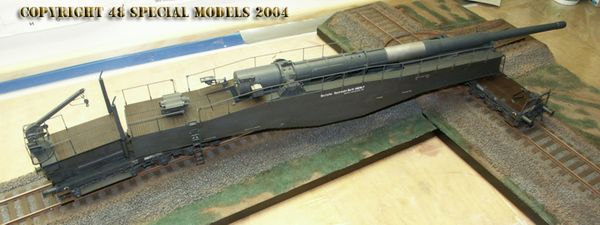
Also
in low elevation. On some guns the recoil area were painted too.
In
this position the hoses on the front chassis need to be removed!
|
|
|
The
diorama will get additional figures, a waggon Typ Ommr and a
Kübelwagen
to bring it to life more.
|
|
|
The
diorama base is about 1,5m x 0,71m. It can be separated to show only
the
straight track.
|
End
|
|