|
Facts
on the
|
Since
February 1st 2002 the E-377 /E-377a with
trolley is
released. This strange German Defense Airforce Project which never
became
operational, is now available from 48
Special Models as a
impressing
resin model, in a limited edition of only 200
kits.
The kit
consists of more
then 60 parts of a very good quality
and is therfore worth its price of € 99,-.
The kit
contains the launch
trolley and the flying bomb E-377 /E-377a
with two different warheads (hollow charge and
SC1800).
The
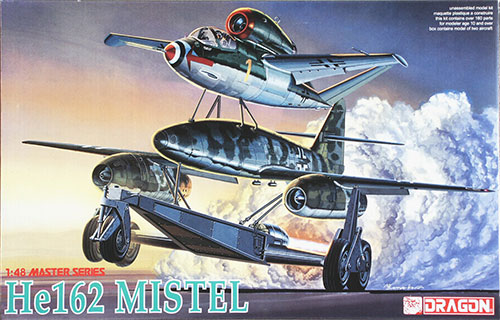
guidance aircraft needed to complete the kit would be either the He 162
"Volksjäger" or the Ar 234C. They have to be purchased seperately!
The He
162 is available from Dragon (inlcuding the V-rudder Version).
The Ar
234C from Hobbycraft, but there are roumors there will be a new
kit soon.
Depending on
which aircraft
is used there are six possible versions (!)
that can be build from the kit:
Mistel
5 He 162/E-377a (powered and Sc 1800)
Mistel
5 He 162/E-377a (powered and hollow charge)
Mistel
5 He 162 with V-rudder/E-377a (powered and hollow charge)
Mistel
5 He 162 with V-rudder/E-377a (powered and Sc1800)
Mistel
6 Ar 234C/E-377 (unpowered and Sc1800)
Mistel
6 Ar 234C/E-377 (unpowered and hollow charge)
|
|
|
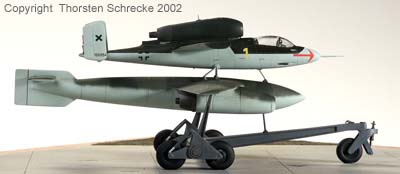
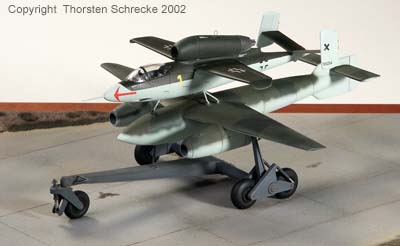
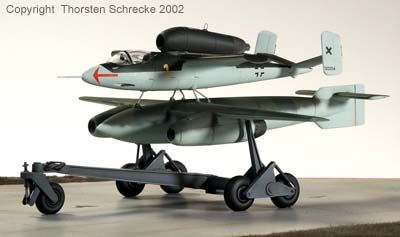
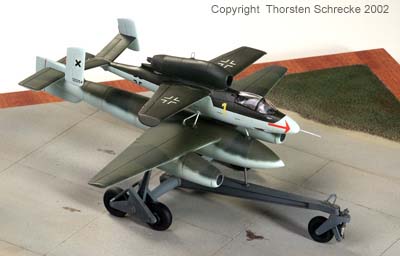
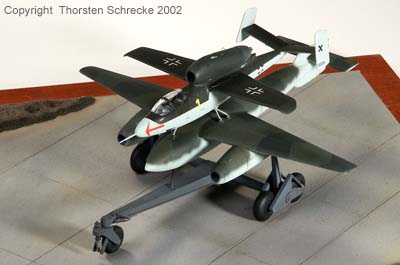
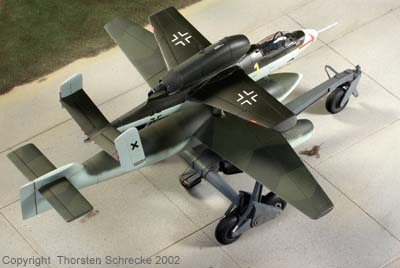
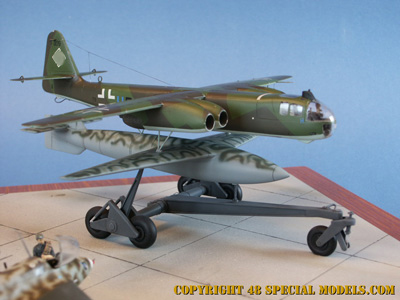
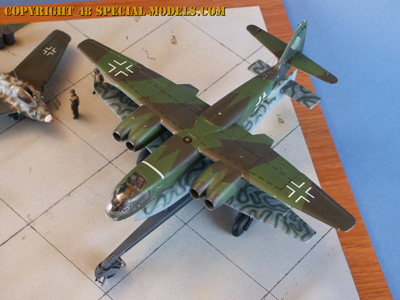
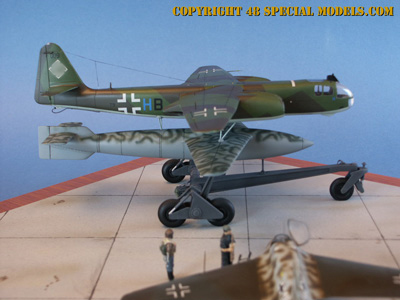
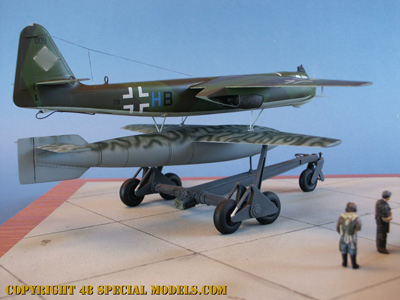
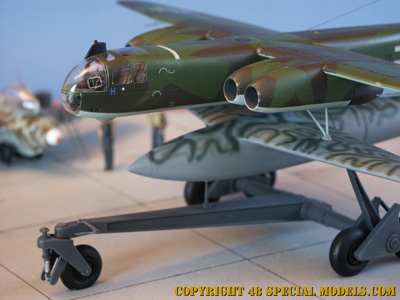
The E-377
is a so called Mistel configuration, consisting of a winged bomb and on
top of it a guidance aircraft. So this Mistel was a most forward
project
(wind channel tests had been started with at the end of the war) it
never
flew.
48
Special Models releases
this kit because it is an impressing example for engineers creativity
in
these days.
As a
guidance aircraft
ether a Heinkel He-162 Salamander
(Volksjäger)
or a Arado Ar 234C "Blitz" (first
jetbomber)
should have be used.
Therefore
two variants
of the winged E-377 Bomb where
planned.
For the He-162 Version more thrust was
needed
so the bomb would be equipped with two jetengines underneath its wings.
This version was named E-377a or Mistel
5.
The Ar-234C
version didn't need this because of the Arado's four engines.
It
also had the advantage that the engines wheren't lost on the mission,
because
they were attached to the guidance aircraft. This version was named E-377
or Mistel 6.
Both
types where designed to be aimed against ship targets, bridges and
bunkers.
Therfore a hollow charge was designed to be mounted in the tip. There
were
also plans to simply use a SC1800 Bomb which would be faired over.
The
E-377 would have been a woodbuild, shoulder winged aircraft, controlled
from the guidance aircraft during flight. It also would have contained
extra fueltanks for the guidance aircraft to widen the range.
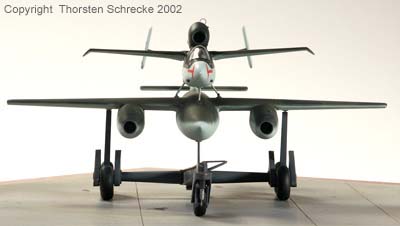
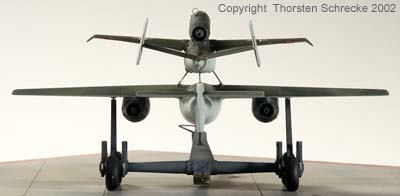
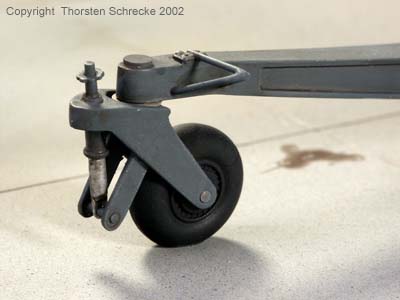
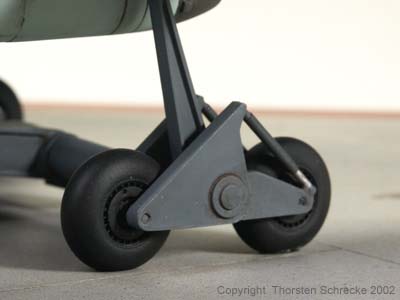
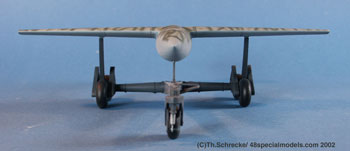
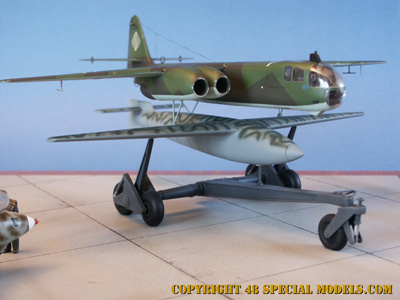
The
Mistel would have taken off from a trolley, like the early Ar-234,
because
the E-377 wouldn't have a landinggear to save weight and material.
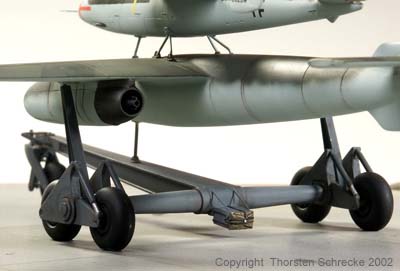
Separation
of the trolley as well as of the guidance aircraft was managed by
explosive
bolts which cut the struts first at the rear then at the front.
Aiming
the target would have been done by a autopiloting device, which would
have
been activated by the pilot before separation. After separation the
E-377
would fly on course until it hit the target.
|
|
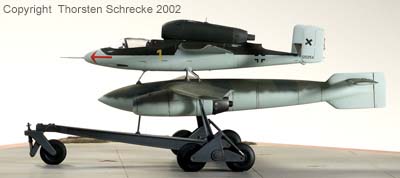
Model
built by Thorsten Schrecke
Photos
by Wolfgang Hartmann
|
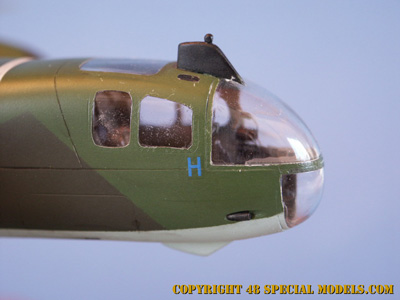
The
He 162 is
the Dragon kit which is not included in the E-377/ a kit! The E-377a
was
built straight from the box and spraypainted in the splinter camouflage
pattern. This pattern wouldn't be used at the time the Mistel would be
operational. It is more ore less an idealised look. It is to assume the
bomb would have been painted in a light grey all over, to protect the
wood,,
with no markings at all.
|
|
|
|
right
side view
|
left
side view
|
|
|
|
front
view
|
back
view
|
|
|
|
|
|
|
|
|
|
|
|

|
|
|
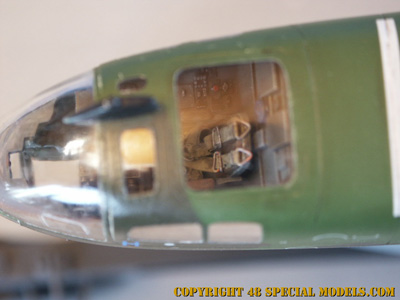
cockpit
detail
|
|
|
|
frontwheel
construction
|
mainwheels
|
|
|
|
detail
backview
|
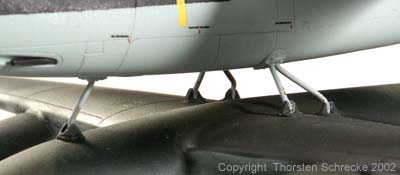
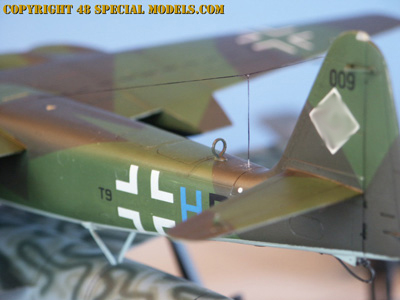
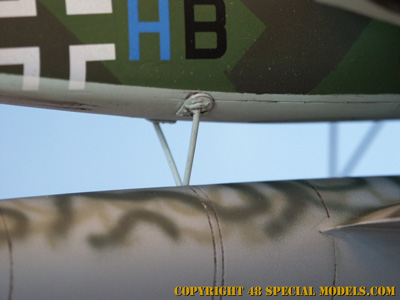
connection
struts
|
|
|
|

|
|
|
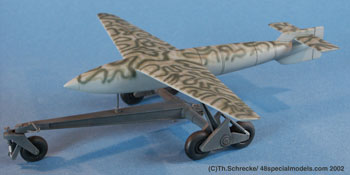
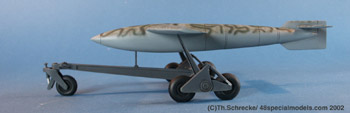
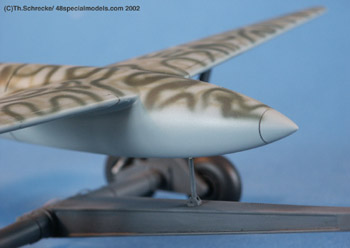
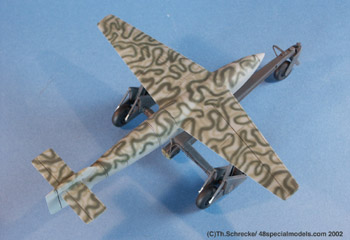
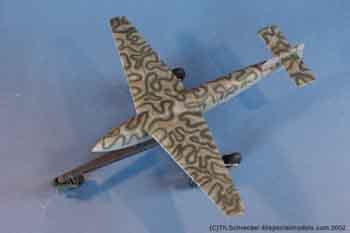
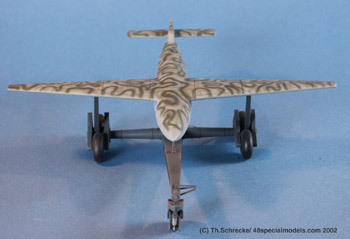
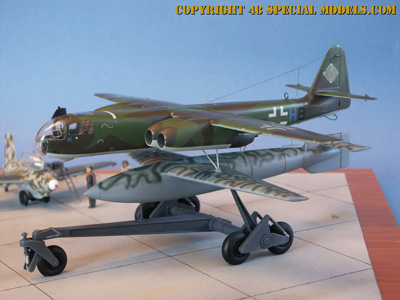
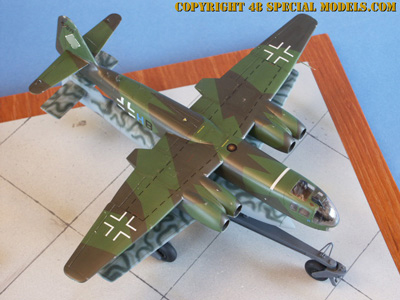
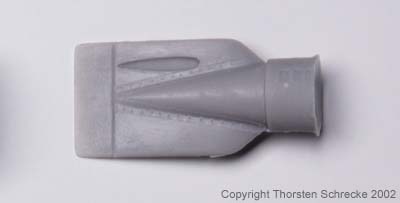
The
E-377A without guidance aircraft Ar 234C
|
The
E-377A differs from the E-377 in lack of
the
jet engines.
|
|

|
|
Side
view of the E-377A with trolley
|
|
|
|
|
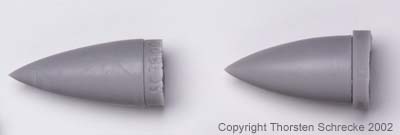
Detail
of warhead, here the SC1800 bomb.
|
Camouflage
scheme is late war tradition,
fast
and individual.
|
|
|
|
Paintpattern
is RLM 76, 02 and 81, in this order.
|
The
trolley is tank grey painted, but could be any other RLM colour too
(that
was available).
|
|

|
|
Front
view
|
|
|
|
|
|
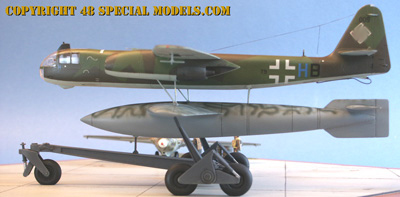
| The Ar234C with E377 glide bomb. |
An impressing aircraft assembly! |
|
|
| This C version has still the B Cockpit, to save wight! |
|
|

|
| |
The figures give a scale. |
|
|
| |
|
|
|
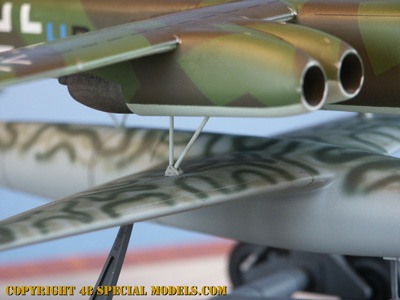
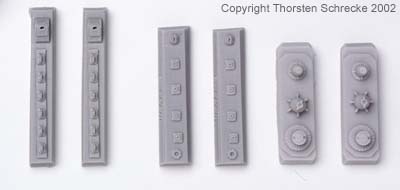
| Antena details. |
The support struts underneath the engines. |
|
|
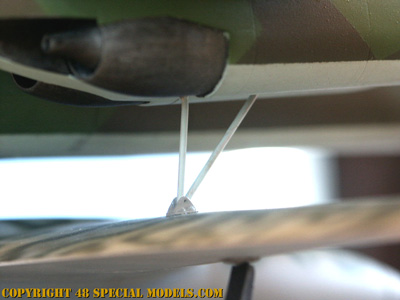
| The tip over strut under the fuselage |
Engine supports prevent vibrations |

|
|
| The break parachute assembly in detail. |
No way in without a ladder! |
|
|
| Bombsight on the B-Version Cockpit |
Seat belts are made from Special Wrap foil. |
|
|
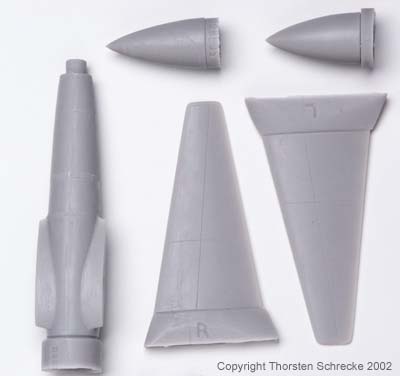
|
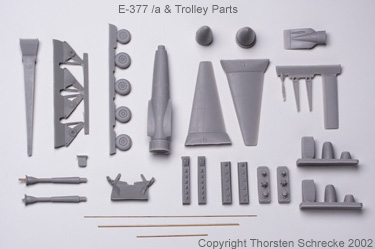
Here
are the main kit contents in an overview. The very small parts are
missing.
The struts for connecting the two airframes are made from brasswire, as
well as the wheel axles.
|
|
|
|
The
kit overview
|
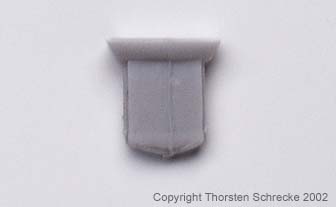
The
front wheelfork
|
|
|
|
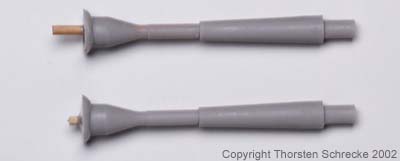
The
axles
|
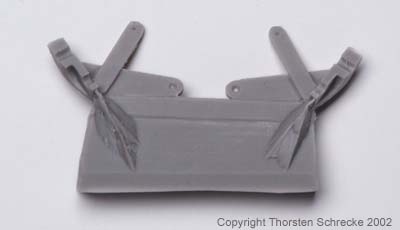
The
breakparachute
|
|
|
|
The
rudder
|
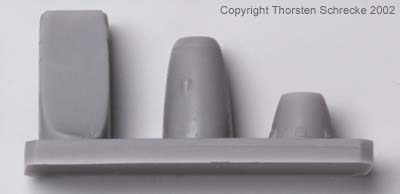
SC
1800 and hollow
charge warheads
|

|
|
|
elevator,
trolley
struts and frontwheelfender
|
fuselage,
wings and
warheads
|
|
|
|
connection
parts
and turbine parts
|
right
main jet engine
|
|
|
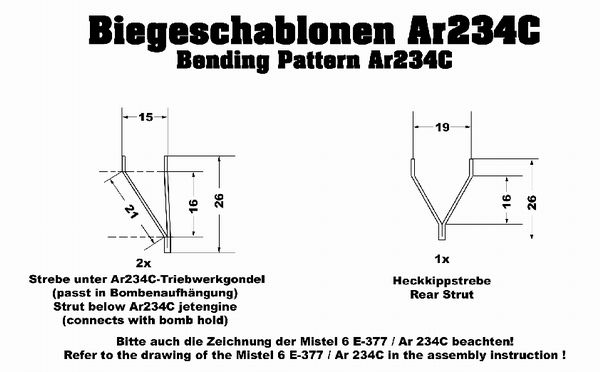
Update:
So the Ar
234 C-3 kit from Hasegawa / Revell is
available
now, here is an update to the E377
Assembly
Instruction.
While
this kit
wasn't released during printing and shipping of the first kits, a
bending
pattern for the Ar234C struts couldn't be attached. This can now be
downloaded
and printed from the link:
Bending
Pattern Ar234C.
The
bending pattern
can also be viewed below, together with some hints for building and
pictures
of the Ar234C / E377.
All
kits shiped
from now on will have this updated Instruction!
|
Attention! Note on the E-377
Due to our
policy of quality management we keep our standards
high on our products. Therefore all 48 Special Models kits are test
built by myself to check them before they are released. Also we keep an
eye on them for a long term to see how they may change during their
lifetime. We hadn't had any problems jet, but during a check on the
E-377 we recognized an effect that can be prevented during building the
model.
Due to the fact that the E-377 bomb is quite heavy, it turned
out that the struts on the trolley may bend after a year or
longer! To prevent this we recommend to lighten the bomb by
drilling
the interior out. The hollow bomb is much lighter than. Also we
recommend to glue the struts, the bomb sits on, to the trolley and
reinforce them by putting in a steel or brass wire!
Reason for
this effect is only the weight of the bomb, which needs to
be manufactured this way. The effect occures after a long time of more
than a year and can be prevented by actions dicribed before. This is not a quality defect of the
kit!
|
Assembly of
the guidance aircraft Ar 234C
So
there was only the hobbycraft kit which was not available while writing
the instruction, an detailed update by 48 Special Models for the new
Hasegawa/
Revell Ar 234C Kit is handed out. The new kit by Hasegawa / Revell
gives
the opportunity to build the Mistel 6 Ar234C / E 377. Therefore the
needed
struts have to be made from the Ø1mm brasswire that comes with
this
kit.
The
assembly is done by use of the drawing that comes with the kit and an
additional
new bending pattern. Little divergences in dimentions may be possible!
Therefore we recommend to check them prior to assembly.
The
Ar-234C has unlike the He-162 a V-shaped rear strut and two V-shaped
struts
on the lower side of the engines. So there were ETC bombmounts it is to
assume they would have been used for conneting to the E-377! This means
the V-struts stayed on the E-377 while it was ejected from the ETC. The
rear strut would have been seperated by explosive bolts.
Assembly
The
front struts on the Ar 234C are connected to the bombmounts underneath
the jet engines. Drill two Ø1mm holes into the depressions of
the
bombmounts on each side. Because the bombmounts are used for
connection,
connectingplates are not needed here. The struts will be cemented in
place
only.
These
struts are parallel and go vertical into the upper side of the E-377
Wing
(distance right to left strut 86 mm). The connecting point is 29mm back
from the wing root, exactly on the engraved centreline. Drill here a
double
hole in each wing, each Ø1mm. Here rests the front strut. On
each
side of the strut two angles can be placed. Therfore sand off one side
of the angles, so it becomes an L-shape and place it to the left and
right
beside the strut on the top of the wing.
The
rear strut has a V-shape. It is connected to the E-377 fuselage by an
angle.
Point of connection is the double engraved ring (like to be seen in the
sketch). It is connected to the Ar 234C to the left and right lower
side
of the fuselage. The distance inbetween is 19mm. The strut is tilted
backwards
a little, so a trapezoid shape is formed with the other struts. This
prevents
the whole structure from vibrating.
The
rear strut is connected to the Ar 234C with the rounded connecting
plates,
also used for the He 162. Therfore drill the holes into the fuselage
first
and cement the plates in place afterwards. Put the strut in place and
cement
it to the Ar 234C. We recommend to first testfit all the struts and
cement
them to the Ar 234C only. After painting is finished the Ar 234C can be
fixed to the E-377 finally.
|
|
|
Original and Fake
|
Some
things you might not believe although you hold them in your hands. This is
what happend to me when I got this new Dragon Kit. It is another sequal
of the "Fairy Tail of Third Reich Aircraft Engineering". Except for the
components, say aircrafts, noting is true in this kit.
|
|
Orginal
and...
|
..."Fake"
|
Sold as a He-162 Mistel by Dragon, this kit in 1/48 scale proofs that
the company shows no respect for modelmakers as well as it has no clue
of the history of German aircraft development during WWII. Has the
Mistel 4 by Dragon only been
a
bad fake of our resin kit, they put one atop by releasing a absolutely
fictional Mistel kit. It shows clearly that they are not afraid of
selling a model to the customer which never was planned by the RLM and
never existed at all.
Big words you may say but here is the proof. I not simply sell the
Mistel 4 and 5/6, but also check the facts and make the master models
myself. During recherche I never came across any kind of information or
hint which let me assume there could be such a project. Nore did I
find a clue that some aircraft engineers did even think about such a
constellation.
You need to know the development facts on the Mistel 4, a Me 262
Mistel, from which this kit is a sequal, as well as the facts on the
E377/a (see our page on this item).
The problems
which
would have occrured on the Me -262 Mistel 4 would have been some of
controlability. Consisting of two Me-262 with 4 engines in total, there
was a simple, but unsolvable problem without
the help of a computer. Four engines where to much to be controlled by
only one pilot. Also the tended to malifunctions and accidents. The
mailfunction of one engine would have led to a desaster. In combination
with a jato rocket, which was necessary for lift of, the whole thing
was not to be controlled at all.
More important is that the combination with the He -162 "Salamander /
Volksjäger" and the Me-262 bomb wouldn't have left the ground at
all
and if it wouldn't made it far. The reason for this was the lack of
enginepower in general. To lift the Mistel of the ground most of the
cargo (explosives and fuel) would have been canceled. Which made the
whole thing useless.
|
|
|
Walther
HWK 109-501 mit 30 sec. Brenndauer
(Bildquelle:
"Die deutschen Raketenflugzeuge 1935-45", Motorbuch Verlag)
|
Schnittzeichnung
des Walther HWK 109-501
(Bildquelle:
"Die deutschen Raketenflugzeuge 1935-45", Motorbuch Verlag)
|
|
The kit itself has the same mistakes as the Me-262 Mistel 4 kit before.
It shows that this was only a fast shot to be released, which has
obviously been inspired by a resin kit. To let this not show to
obviously or/and because it wasn't checked firmly at that time some
details lack accurcy or are simply wrong.
The troly for example was welded not bolted!
The used jato rocket would have been a HWK 109-501 with 1500kp thrust
for 30sec. The one in the modelkit used is a HWK 109-500 wich has only
500kp for 30sec..This one would have pushed the whole thing to slowly
if at all. It never had lifted of the ground!
In the kit the same wrong trolley was used again, like included in the
Me 262 Mistel 4 kit (see our info on the Mistel 4
page). Instead of
the Me-262 A1 a He-162 was added as a guidance aircraft ad best of all
to save thinking they used the same struts like on the 48 Special Models He-162 / E-377a Mistel 5 kit.
Who ever buys this kit should know that he buys pure Science Fiction or
a nice spare parts box with parts to build several better Mistel Models
. Because the good on this kit is it contains the He-162 with V-tail!
This one fits as a guidance aircraft on the 48 Special Models
Mistel5/6 kit, which you should order in addition the same time!
From the Dragon trolley and the Me-262 bomb you may convert a more or
less correct Mistel 4 by useing a Me-262 U2 (bombercockpit) from
Dragon. By checking our website you may find the way to make the
correct struts for this Mistel version too. I would change the tyres on
the trolley to the Ju88/Ju188 tyres from the Dragon kit or flatened
tyres of the same type ;0)) .
Seen this way the kit isn't that bad at all it after all makes some
sense. But who builts it as it comes from the box risks to be the
"greenhorn of the day" on the next model exhibition!
Ah, by the way, the markings on my Mistel (see pic. above) I choose
freely from different other decal sets. Especially the remarkable
"yellow 1" , which comes from a kit I can't remember and which I chose
because of the prototype like character of the model.
Nice of the artist, who made the box art on the Dragon Kit, to be the
same oppinion on this point even with the color! |
|