 |
F-104 Starfighter Pilot
Deutsche Bundesluftwaffe
Resin Kit
by 48 Special Models
in 1/18 scale |
Low stock!

 |
 |
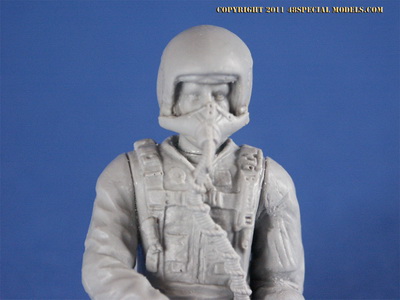
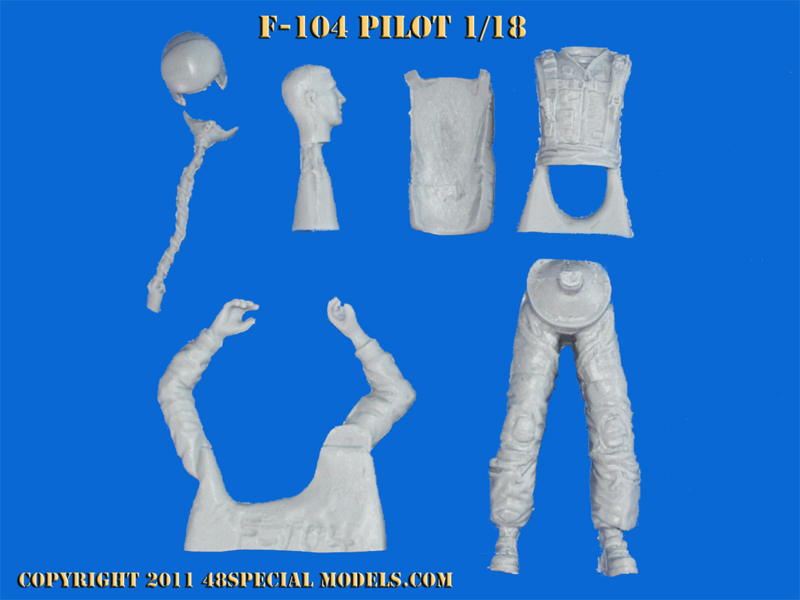
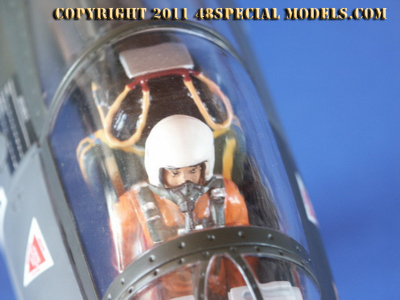
| Helmet and Mask are seperate parts! The also can be show taken off, such as in parking position. |
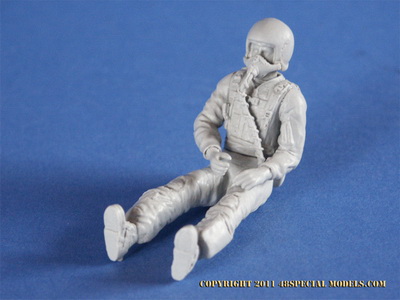
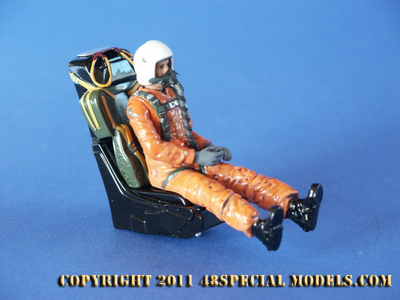
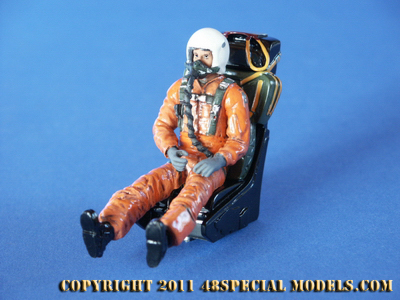
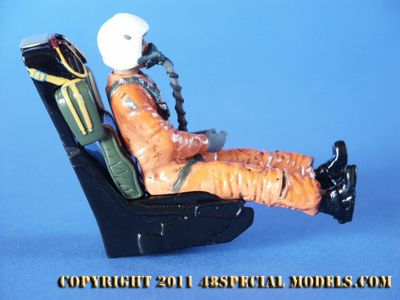
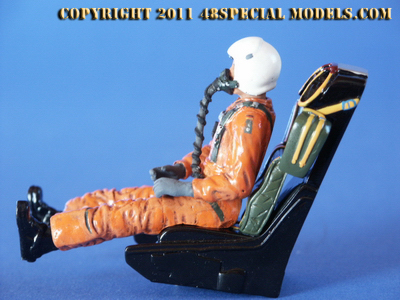
The figure when assembled. |
 |
 |
The parachute is s seperate part that needs to be glued to the body.
In the German "Boelke" Version this parts is not needed!
|
The armes can be adjusted in their position, for customisation.
|
 |
 |
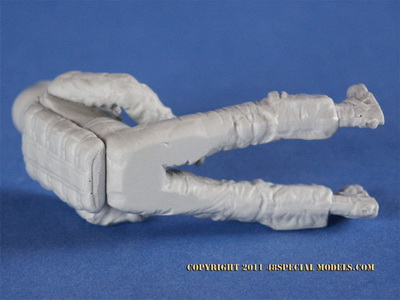
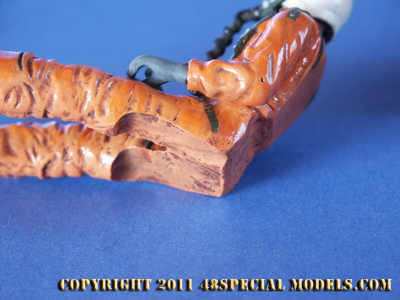
To make the pilot fit to the cockpit his back was flatened.
This reperesents the pressure caused depressions in the seat.
For the "Boelke version some adjustments are needed. See the guide below for details.
|
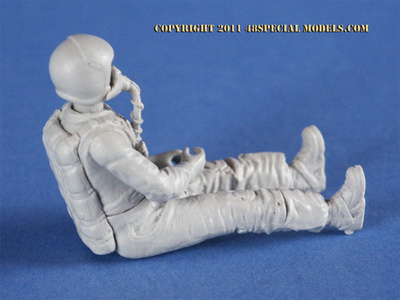
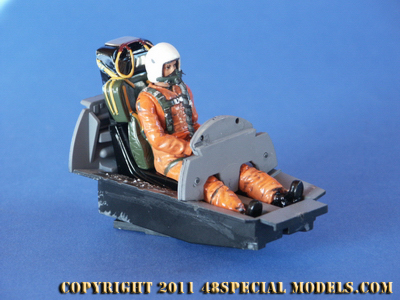
The pilots position looks less relaxed and isn't for sure,
but it is the only way to get the figure into the cockpit!
|
 |
|
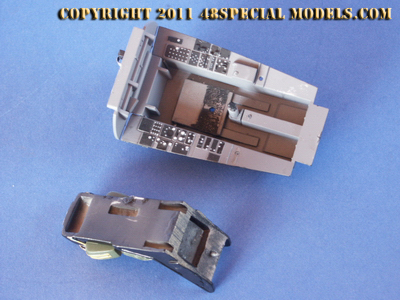
| All the kits parts in a view. |
|
|
| Assembly of F-104G Boelke Pilot |
 |
 |
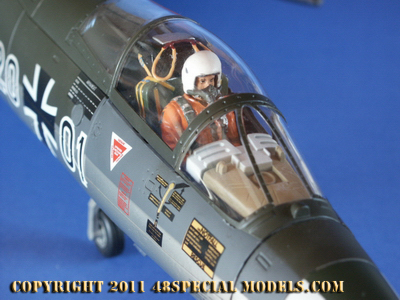
During
the 70's and beginning 1980's the German Luftwaffe pilots wore a high
visability overall on training missions for security reasons. Most
helmets at that time were white.
|
The oxygen mask was dark gray with a mid gray hose
and green belts for detaching.
The com-wire at the oxygen hose was gloss black,
as well as the boots.
|
 |
 |
Good to be seen here ist the need for adjusting the pilots back to the seat shape.
The seat of teh Boelke is simply glued to the cockpit
and can be taken out carefull.
|
The pilots back shape can be even more shaped to the seat than shown here.
|
 |
 |
By
routing the surplus off like shown in this picture, the pilots body can
be adjusted like he would sit when belted thight to the seat. Some test
fitting will be necessary.
|
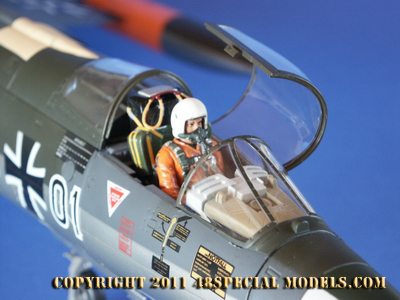
The pilots position in the cockpit is obviosly different from the previous versions with the older ejection seat.
To show this better here the sole cockpit view.
Note: You can't remove the cockpit without dissassembling the complete aircraft model!
|
 |
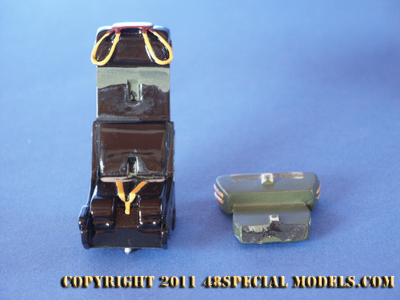 |
The seat is made of resin cast material and glued in only!
By moving the seat carefuly from side to side it can be removed from the cockpit.
This will help to make the pilot fit to the seat!
|
The seat is made from two parts.
The seat and the parchute pack.
When dissassembled the poor painting can be
touched up easy.
|
 |
 |
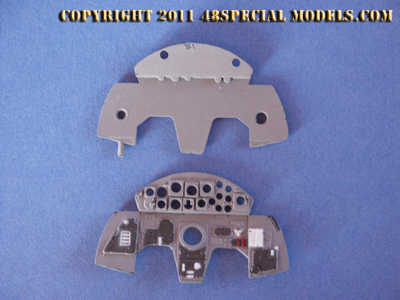
Only
when taking the whole aircraft apart you may get to the dashboard. This
is made of two parts and prepared for adding a photo foil of the
instruments as well as back lighting!
This is a do it yourself job.
It is not provided by the manufacturer for cost reasons probably.
|
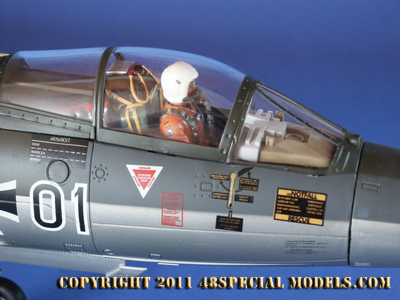
The ready made figure in the cockpit.
This one could be seated a bit lower.
The seat should have the same hight as the helmet,
even a bit higher.
|
 |
 |
To remove the seat the canopy needs to be taken off.
This is simple to do, but needs some care to acomplish!
Open the canopy and push it backwards carefull. Then lift the front pin from the gap carefull first.
Assembly goes in reverse order. |
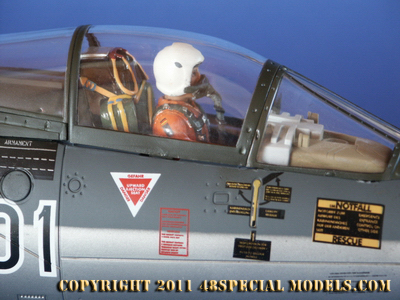
Almost like the real thing!
See the Internet for painting shemes and photos.
|
 |
 |
Painting the figure is not a high skill, but needs some talent.
|
The oxygen mask and helmet can also be shown in taken off position.
|
|
Assembly And Painting Hints
To paint the pilot like shown above, you need to clean it with thinner
or benze. So the release agent is a wax it needs to be done quite well,
because it sticks well! After that all parts should be sanded with a
sanding pad to scratch the surface a little for better contact.
Make the figur fit to the seat first. It is possible to give the pilot
an individual position, by modifying him. Here I will only discribe the
intended way of making it fit to the cockpit.
The seat can, but doesn't need to be removed for making the pilot fit
to it. If you are afraid to damage the model you may not do so. It will
only take a bit longer.
The included parachute pack is for the older versions only. For the "Boelke" Version it is not needed!
The pilot's legs fit the seat and cockpit perfect, as long as the butt
is reduced of the seat thickness. Because the new seat is a bit longer
and thicker as the presestors the figure needs to be cut out quite a
lot. But this is no problem, because it doesn't show in the end. So testfitting is a helpfull thing.
Cement the upper torso to the lower body first. With help of the
seperated seat it s quite simple to get the right angle. In other case
it's a good idea to make a card board pattern first!
After that rout and sand off the butt and back side of the figure, as
shown in the pictures above. I marked the surplus with a pen and
drumsanded it off. I used the heavy duty drumsander on my minidrill
first and a fine grade one later. Have a vaccumcleaner ready to vaccum
all the dust or you stand in a cloud! Useing a set of protective
googles and dust mask makes sense too!
It kind of hurts to grind to the pilots privat parts, but its much
easier then making the seat fit and doesn't damage the model too.
The pilots hight is right as soon as he fits the seat wearing the
helmet and rises not higher then the backrest. In fact he should be
even a bit lower. In flight he also sits pressed tight to the
beackrest! So make the complete back fit to the rest (not only the
lower part as shown in the picture).
In real the pilot is fastened by seatbelt very tight and will not move
an inch. So the backrest will take the backs shape, which is impossible
here.
As soon as the body fits the cockpit this part of the assembly is done. Arms, helmet and head will be added after painting!
Painting the figure is simple and is done in the usual way. After
priming with a resin primer or modell primer a first layer of darker
orange is applied. On top of this two layers of lighter orange are
drybrushed. Make sure the previous layer has dried completely before
applying the next layer. You may add some more shades, if you feel
like. In the end you will have a shining bright orange overall with
darker shadow areas.
After drying the details are painted, such as the boots in black. At
that time the boots were made of real leather and had to be shiny too!
This is why they are painted in gloss black. More additional
drybrushing is not needed, because the feet and lower body are not
visible at all. They vanish behind the dashboard.
To paint the arms and the head I put them on a pole. I made some
handles from a round piece of wood like a brush handle or similar and
gued a nail to its top. Just cut an old brush handle of and drill a
small hole to the top end. Glue a nail to the hole and you have a
handle you can pin a head or arm to.
Drill a hole to the arm or neck of the head at a place that will later
be invisible, because its covered with glue. This helps you holding the
parts and being able to paint them from any side you need to. Also it
helps letting the parts dry by putting them in a glas.
At the shoulders German pilots have the German flag as a national
identification and below it the rank marking. Painting the flag by
hand in a size like that is a punishment. It is much easier to check
your decals archive for a 1/35 scale German Army lisence plate decal.
These have the flag in the right size printed on! Just cut it out with
a hobby knife, make it fit to size and attach it to the painted figure,
done.
The rank is a field green rectangular which is painted
below the flag. It is the same width like the flag and three times
longer (higher). The rank starts with Leutnant upwards and is painted
in silver. Most easy are Leutnant and Oberleutnant because they have one and two diamonds. Oakleaf is a bit harder to be painted.
The head will be flesh color and gets some eyes and a mouth painted on
too. Both are a bit tougher to accomplish, because it needs a
fine brush and a calm hand to do. The fine brush is available in our
Webshop, the calm hand are a talent and the paint should have the
correct viscosity. You will need some tries probably, therefore it is a
good idea to use an acrylic paint here. For mixing small amounts of
paint I always use our Special Mix paletts. These vaccuformed cups are perfect to mix very small amounts of paint for figure decoration.
For making the eyes first add a white spot. This one is very small and
less than a drop of paint, so be careful to only fill the inside eye.
Let it dry completely. After that place a small black dot in the
middle, about 1/3 to 1/2 of the eye's surface. Useing a light brown or
thinned black the lid line is placed above the eye.
It is just a very thin line, but with a large effect! Most complicated
is to let both eyes look the same. This is why it is important to put
the dot right in the middle.
In addition another line can be placed below the eye, with a bit of a gap to the eye, to make them look bigger and wider.
Now give him some eye brows and a mouth in pink. Because the mouth is
covered with the oxygen mask you may skip this, if you glue the mask
permanent to the face. But you definitly will have to make the eyes!
As soon as the head has dried, a dark wash of sephia brown will give
him a healthy look and some more depht. But careful the wash will stick
to the eyes too, so clean them instantly!
The pilots hair is only visible if the helmet is taken off. So you can
skip this or paint the complete head with flesh first. After that
drybrush the hair area with a darker brown or black. Add a second layer
in a lighter tone to it and watch the direction! Hair never has one
color. It is always a mix of many colors.
Everbody who has the pilot wear a helmet read here. Glue
the helmet to a wooden pole. Use the inside to attach it to the
pole for good reason. So the helmet is covered with release agent on
the inside, it can be seperated later easy. Spraypaint the helmet in
white 2-3 times to cover it perfect. If you use a brush, thin down the
color and apply it 2-3 times. It will be as good as spraypainting
if the color was thin enough.
The helmet's inside is painted dark gray. Paint only as far as visible.
The visor is visible only a little. Paint it silver first and later add
smoke or thinned down gloss black in 2 to 3 layers, to make it
look translucent. Paint the knobs at the helmet's sides in dark gray
and square shaped.
The pilots seat belts depend on the ejection seat type and are mostly
green or olive. The parachute belts are always green and have silver
buckles. For better details refer to a picture you may find in the
internet or a book. By use of these pictures you may as well like to
give the seat a touch up and make both fit perfect.
The pilots mask is dark gray and has a mid gray hose on which a black
wire runs. The mask's belts are blueish green. After painting the mask
a dark wash is helpful to bring out the details and shape. Attach the
mask to the helmet after head and helmet are attached to the pilot! The
hose can be shaped or bend by warming it careful. Should be done before
painting it!
After the figure and seperate parts are painted and dried the glueing
points need to be cleaned from paint previous to cementing them. Take
care to shorten the neck correctly so it fits perfect, because it is to
long. This helps to adjust it perfect and give it an individual
position too. The figure needs to be as high or lower than the backrest
of the seat! So testfit first!!
Does the head fit, the helmet can be cemented on, too. The figure can
be shown without the helmet on, too. The helmet also can be resting on
the instruments as well i.e..
Here the basic way assembly. Put enough glue inside the helmet, but not
too much so it squishes out at the sides! Then place the head inside.
It helps to have the head still on the handle. Use a slow cynoacrylat
glue, so you can adjust position of the helmet. Let it rest and dry in
head over heels position to prevent glue running down the face!
Next glue the head to the figure and place it in the cockpit. Now the
arms will be attached. Depending on what arm position is wanted, they
can be glued on now. After that remove the figure from the cockpit
again to clean the glueing spots from glue and touch up the paint
there. Attach the oxygen mask then. By heating it up carefull it may be
bent to fit perfect! Fix it in position with some glue and done!
|
|